Integrating Swagger with NestJS: A Step-by-Step Guide
Integrating Swagger with NestJS: A Step-by-Step Guide
API development often requires a clear visual representation and testing mechanism for endpoints. This is where Swagger, an open-source tool, comes into play. If you’re working with NestJS — a progressive Node.js framework — you’re in luck! The integration of Swagger is seamless and powerful. Let’s explore how to do this.
Why Swagger?
Swagger offers a set of tools for designing, building, and documenting RESTful APIs. The most notable of these tools is Swagger UI, which provides a visual platform to interact with the API’s endpoints without any integrated front end.
Prerequisites
- Basic knowledge of TypeScript and NestJS.
- A NestJS project setup. If you don’t have one, you can set it up using the Nest CLI.
Step-by-Step Integration
1. Installing Required Packages:
Start by installing the necessary libraries:
npm install @nestjs/swagger swagger-ui-express2. Setting Up Swagger:
Navigate to your main file (typically main.ts) and set up Swagger:
import { NestFactory } from '@nestjs/core';
import { SwaggerModule, DocumentBuilder } from '@nestjs/swagger';
import { AppModule } from './app.module';

async function bootstrap() {
  const app = await NestFactory.create(AppModule);
  const options = new DocumentBuilder()
    .setTitle('Your API Title')
    .setDescription('Your API description')
    .setVersion('1.0')
    .addServer('http://localhost:3000/', 'Local environment')
    .addServer('https://staging.yourapi.com/', 'Staging')
    .addServer('https://production.yourapi.com/', 'Production')
    .addTag('Your API Tag')
    .build();

const document = SwaggerModule.createDocument(app, options);
  SwaggerModule.setup('api-docs', app, document);

await app.listen(process.env.PORT || 3000);
}
bootstrap();
With this setup, your Swagger UI will be available at http://localhost:3000/api-docs.

http://localhost:3000/api-docsIt feels almost otherworldly, doesn’t it? The tedious task of manually drafting .yml or .json files has been whisked away. Everything is generated on the fly. And the best part? Instead of just hosting, you have the option to download and utilize it in diverse manners. Also, you can check we have a dropdown where we select the Server base URL.
3. Annotating APIs with Swagger Decorators:
NestJS provides decorators that integrate seamlessly with Swagger to auto-generate documentation.
a) Controllers and Routes:
Decorate your controllers and routes with appropriate Swagger decorators:
import { Controller, Get } from '@nestjs/common';
import { ApiTags } from '@nestjs/swagger';

@ApiTags('User')
@Controller('user')
export class UserController {
  @Get()
  findAllUsers(): string {
    return this.userService.findAll();
  }
}
b) Defining Data Models:
Use class decorators to define data models and DTOs:
import { ApiProperty } from '@nestjs/swagger';
import { IsEmail, IsNotEmpty, MinLength } from 'class-validator';
export enum UserRole {
Admin = 'Admin',
Moderator = 'Moderator',
User = 'User'
}
export class CreateUserDto {
id: number;
@ApiProperty({
example: 'rehmat.sayani@gmail.com',
required: true
})
@IsEmail()
email: string;
@ApiProperty({
example: '1234578910',
required: true
})
@IsNotEmpty()
@MinLength(10)
password: string;
@ApiProperty({ example: "Admin|Moderator|User"})
role: UserRole;
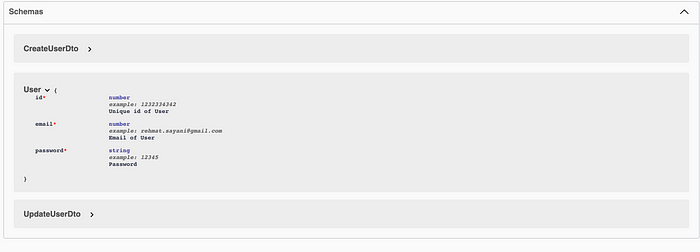
}populated UI Schema for swagger
c) Further Descriptions:
Enhance endpoint documentation using @ApiResponse(), @ApiBody(), and more.
export class UserController {
    @Post()
    @ApiResponse({ status: 201, description: 'The record has been successfully created.'})
    @ApiResponse({ status: 403, description: 'Forbidden.'})
    @ApiBody({
       type: CreateUserDto,
       description: 'Json structure for user object',
    })
    async create(@Body() createUserDto: CreateUserDto) {
      this.userService.create(createUserDto);
     }
}
Poulates request body for swagger in the below image
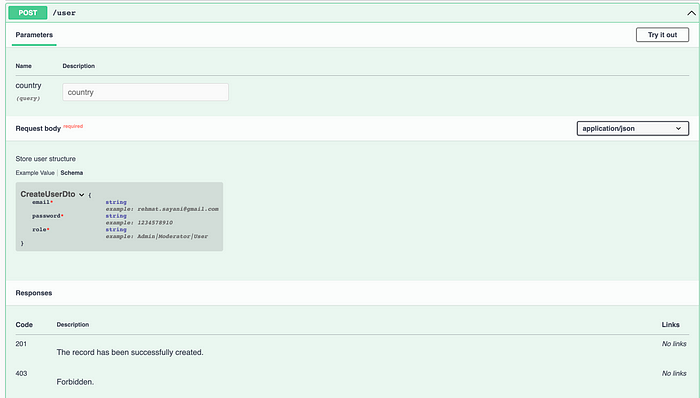
4. Adding Global Parameters:
In some scenarios, you may have parameters that are consistent across all routes, such as headers for authentication. In my case, we have a country parameter which is a query parameter and is required in all routes of the application. NestJS Swagger has a direct way to globally set these.
Here’s how:
Navigate to your main file again (typically main.ts) and update your code.
async function bootstrap() {
  const app = await NestFactory.create(AppModule);
  const options = new DocumentBuilder()
    .setTitle('Your API Title')
    .setDescription('Your API description')
    .setVersion('1.0')
    .addServer('http://localhost:3000/', 'Local environment')
    .addServer('https://staging.yourapi.com/', 'Staging')
    .addServer('https://production.yourapi.com/', 'Production')
    .addTag('Your API Tag')
    .addGlobalParameters({
      name: 'country',
      in: 'query'
    })
    .build();

const document = SwaggerModule.createDocument(app, options);
  SwaggerModule.setup('api-docs', app, document);

await app.listen(process.env.PORT || 3000);
}
bootstrap();
5. Refine and Expand:
Now that you’ve set the base for Swagger integration, ensure that you annotate new routes, update DTOs as they evolve, and consistently refine your API documentation to match the functionality.
6. Explore and Test:
Swagger UI isn’t just for documentation. Use it to test your endpoints directly from the browser. This becomes especially handy when debugging or when providing examples to frontend teams.
Conclusion:
Swagger and NestJS go hand in hand when it comes to building professional, clear, and interactive APIs. With just a few decorators, you can transform your API documentation from plain text to an interactive playground. Not only does this enhance developer experience, but it also ensures that everyone interacting with your API — be it frontend developers, QA teams, or stakeholders — has a clear understanding of its functionality. Happy documenting! 🚀